19.7 miles (31.8km) with 337m of total ascent
 |
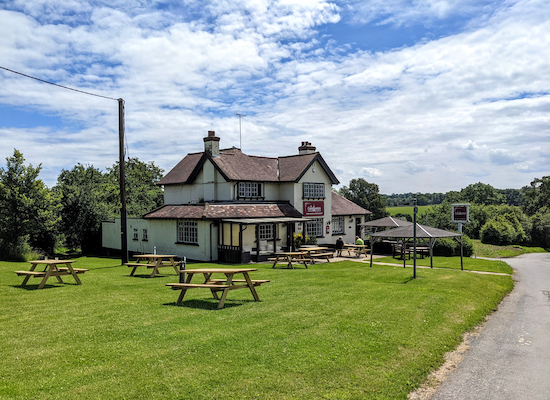
| The footpath leaving The Woodman at point 36 |
Getting there
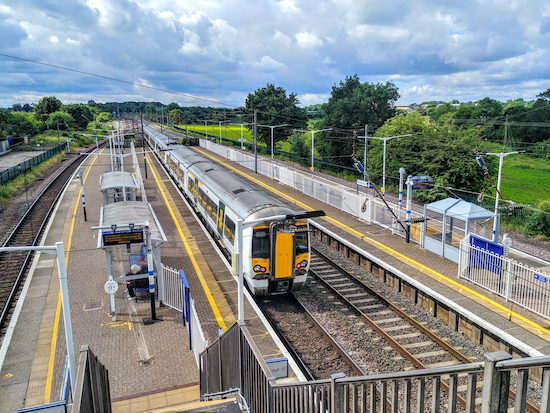
There are bus stops in Brookmans Park village close to the start of the walk (location - https://w3w.co/bulb.ranges.rates), which are served by the number 200, 201, 242, 305, 355, 610 buses. You can check bus times at Intalink. The walk starts and finishes at Brookmans Park train station (location - https://w3w.co/bottle.incomes.path) . For those who prefer to drive there is a car park at point 4 (location - https://w3w.co/edge.usual.cloth) in the walk which is an alternative starting point.
Fly through preview of walk
If you want to check what sort of landscape you will be crossing before you set off on this walk you can view a short 3D video of the route below. It's created using the free version of Relive.
Directions
GPX or KML files for this walk. We've added What3Words location references for those who use that system. If you print these walks you might want to use the green PrintFriendly icon at the bottom of these directions to delete elements such as photographs.
 |
| Brookmans Park Station |
Continue with Bradmore Green on your left heading SE along Bluebridge Road for 360m until you reach Bluebridge Avenue on the left (location - https://w3w.co/stores.friend.match).
2: Turn left on Bluebridge Avenue then head ENE for 195m until you reach a gate leading to Moffats Open Space (location - https://w3w.co/stage.shunts.invent).
3: Go through the gate, turn right, then follow the track SE for 70m to a gap in the hedgerow (location - https://w3w.co/remain.basin.cage).
Go through the gap, turn left then head E with the woodland on the left and field on the right for 215m until you reach another gap in the hedgerow (location - https://w3w.co/tips.trains.shots).
Point 4 below is where you would pick up the walk if you opted to park in the parish council run car park at Gobions Open Space (location - https://w3w.co/poster.belly.ally).4: Once through the gap turn diagonally to the right then head SE across a field for 135m until you reach Gobions Pond (location - https://w3w.co/quiet.pens.over).
5: Turn left when you reach the pond then follow the northern perimeter path as it heads ENE then ESE for 340m, with the pond on the right, until you reach a junction (location - https://w3w.co/diner.deeply.times).
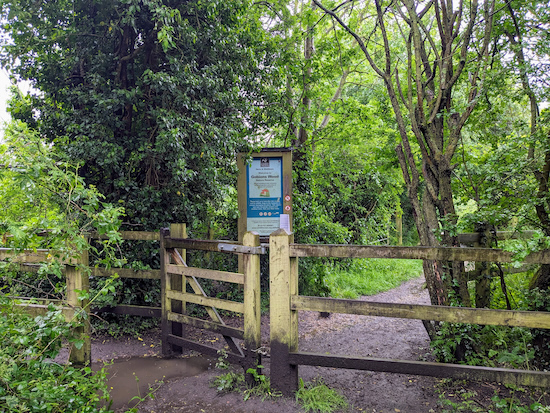
6: Turn right at the junction then follow the path S for 50m until you reach a gate (location - https://w3w.co/opens.year.heads) leading to Gobions Wood, a Herts and Middlesex Wildlife Trust nature reserve, which was once a manor house with a rich history.
 |
| Go through the gate leading to Gobions Wood |
Once you are in the woodland take the middle path of three and head S and downhill to a footbridge (location - https://w3w.co/tanks.loaf.custom).
 |
| Cross the footbridge then turn right |
 |
| The third footbridge |
 |
| Go through the gate then follow the path S |
Go through the gap then follow the path, North Mymms footpath 11, as it heads SSE diagonally to the right and uphill for 215m until you reach Hawkshead Road, with Folly Arch on the left (location - https://w3w.co/terms.horns.trio).
8: Turn right on Hawkshead Road then head W for 320m until you reach a permissive path on the left just past the RVC (Royal Veterinary College) Bolton's Farm (location - https://w3w.co/cloth.switch.stages).
9: Take this path, which is a permissive path for RVC students and which continues to run W, with Hawkshead Road on the right, for 525m until the path reaches a driveway (location - https://w3w.co/spicy.studio.placed).
Continue heading W along the permissive path for 145m until it emerges on Hawkshead Lane (location - https://w3w.co/runner.hiding.young).
10: Cross Hawkshead Lane then continue on the permissive path (location - https://w3w.co/items.gained.faced) as it turns left then heads W for 175m with the hedgerow on the left and field on the right until it rejoins Hawkshead Lane just before a railway bridge(location - https://w3w.co/maple.sticks.keys).
Cross the railway bridge then take the track on the right immediately after the bridge (location - https://w3w.co/deals.robots.abode).
11: Head N, with the railway on the right. This is a continuation of North Mymms footpath 11. After 230m ignore a track that goes off to the left (location - https://w3w.co/award.amber.stews) and continue heading N with the railway on the right for 155m until you reach a footpath on the left (location - https://w3w.co/fears.chains.brush).
12: Turn left, still on North Mymms footpath 11, then head NW down some steep steps and then continue with Ray Brook on the right for 355m until you reach a junction and a gate (location - https://w3w.co/colleague.adding.risk).
Go through the gate then continue on North Mymms footpath 11 now heading W with the hedgerow on the right and fields on the left, for 240m until you reach a gate on the right (location - https://w3w.co/sides.match.salad).
 |
| Go through the gate then cross a footbridge |
Go through the gate then head W, still on North Mymms footpath 11 (which along this stretch is known as Wises Lane).
Continue heading W through Brick Kiln Wood with Ray Brook now on the left. Follow this path for 470m ignoring a footpath off to the left (location - https://w3w.co/phones.digits.silver).
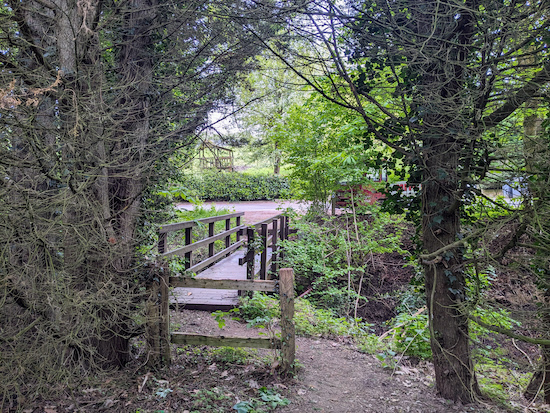
Continue until you reach a wooden elevated walkway (location - https://w3w.co/eager.bland.smile) leading to a bridge over Mimmshall Brook (location - https://w3w.co/pads.rather.eating), see image below.
 |
| Continue along the wooden walkway to a concrete footbridge |
14: Cross the footbridge then turn right on Warrengate Road (location - https://w3w.co/coast.mimic.tricks). Head NNW for 205m until you reach the junction with Bradmore Lane on the right (location - https://w3w.co/change.powder.laptop).
15: Continue along Warrengate Road, heading NNW, for 350m until you reach The Woodman Inn on the right (location - https://w3w.co/common.nerve.uses).
 |
| The Woodman Inn, Water End |
16: Turn right then follow a track that runs NNW and parallel to Swanland Road for 195m. Ignore the first footpath on the right immediately after a bridge (location - https://w3w.co/nail.focal.stop) and continue to the second footpath on the right (location - https://w3w.co/loops.hurls.nodded).
17: Turn right on North Mymms footpath 30 then head E for 200m with the hedgerow on the right. Ignore a footpath that crosses your path along the way (location - https://w3w.co/thigh.trim.doctor). Continue to the corner of the field (location - https://w3w.co/damage.tamed.being).
18: Follow North Mymms footpath 30 as it bends left then heads NE with the woodland on the right and field on the left for 85m until it bends right through the hedgerow (location - https://w3w.co/sorry.stole.galaxy).
Turn right, still on North Mymms footpath 30, then follow the path downhill for 70m to a footbridge (location - https://w3w.co/invite.narrow.safe), see image below.
 |
| Cross the footbridge then keep left |
19: Turn left at the junction then head NE, now on North Mymms footpath 32 and with the hedgerow on the left and field on the right. Continue for 220m until you reach a footpath on the left (location - https://w3w.co/wisely.tops.poppy).
20: Turn left then head N for 80m crossing two footbridges and emerging at a field (location - https://w3w.co/laws.tile.third).
21: Turn right then follow North Mymms footpath 8 ENE for 100m with the hedgerow on the right and field on the left until the footpath bends left (location - https://w3w.co/shaky.driven.bunny) then heads NE across an arable field for 370m until it reaches Station Road (location - https://w3w.co/hurt.landed.transit).
* If you need refreshments you could turn left on Station Road then head NW for 235m to The Sibthorpe Arms (location - https://w3w.co/racks.varieties.lows).22: Turn right on Station Road then head SSE for 80m until you reach a footpath on the left (location - https://w3w.co/hips.storm.random).
23: Turn left on North Mymms footpath 34 then follow it behind houses as it heads first ENE then SE for 85m until it reaches a track (location - https://w3w.co/flows.tolls.statue).
Turn left on the track, still North Mymms footpath 34, then follow it SE for 50m until it crosses a small stream (location - https://w3w.co/hype.youth.thus).
Continue for 20m until North Mymms footpath 34 bends left then climbs some stairs then heads NE (location - https://w3w.co/lanes.rating.lodge).
24: Follow North Mymms footpath 34 in a north-easterly direction for 330m until you reach Bulls Lane (location - https://w3w.co/traps.sudden.films).
25: Turn right on Bulls Lane, go under the railway bridge, then head ESE for 70m until you reach a footpath on the right immediately after a caravan park (location - https://w3w.co/guises.transit.emerge).
26: Turn right on North Mymms footpath 33 then follow it ESE as it runs parallel to Bulls Lane for 360m until you reach a junction (location - https://w3w.co/mutual.issued.rated).
Ignore a footpath on the left and continue heading ESE across a footbridge (location - https://w3w.co/brands.thigh.sudden) and still on North Mymms footpath 33.
27: After crossing the footbridge follow North Mymms footpath 33 as it bends right then heads SSE then SE then E and SE for 1.2km, with the woodland on the right and fields on the left, until you reach Bell Lane (location - https://w3w.co/accent.kicked.hits).
28: Turn left on Bell Lane then head N through Bell Bar for 450m until you reach The Great North Road (location - https://w3w.co/town.animal.rich).
* Bell Bar has an interesting history. At one point it was a major overnight stopping place for horse-drawn coaches travelling between London and the north. If you need refreshments when you reach The Great North Road could turn right then head SE for 120m to visit The Cock o' the North (location - https://w3w.co/army.shrimp.deputy) or continue for another 150m to visit The Dutch Market Place cafe (location - https://w3w.co/second.cross.weeks).29: Cross The Great North Road to Woodside Lane on the other side. On the right, at the junction of Woodside Lane and The Great North Road look out for a footpath on the right (location - https://w3w.co/stored.crisis.barks).
Turn right on North Mymms footpath 66 then follow it NE and diagonally to the right across an arable field for 150m until you reach a short patch of woodland (location - https://w3w.co/paying.pushes.cowboy).
* As you follow the path through this woodland look to your left to see the remains of a Tett Turret, a piece of WWII archaeology (location - https://w3w.co/bridge.chemistry.activism).
 |
| The remains of the WWEII Tett turret |
31: Cross the ditch then continues across another arable field for 240m before reaching Grubbs Lane (location - https://w3w.co/dices.agreed.blur).
32: Turn left on Grubbs Lane then head NW for 60m until you reach a footpath on the right (location - https://w3w.co/movies.begun.sadly), see image below.
 |
| Turn right on Hatfield footpath 84 |
 |
| Go through the gap, still on Hatfield footpath 84 |
Turn right at the hedgerow then head NE, still on Hatfield footpath 84, continuing for 215m with the hedgerow on the left and field on the right until you reach a gap in the hedgerow (location - https://w3w.co/feels.grapes.rivers).
 |
| Go though the gap |
Continue as the path bends to the right then heads NE for 95m, still with the hedgerow on the left and field on the right until you reach a gap in the hedgerow on the left (location - https://w3w.co/noting.slams.liability).
 |
| Go through the gap, still on Hatfield footpath 84 |
Continue for 265m crossing two footbridges before reaching a gate that leads to the car park at The Woodman, Wildhill. (location - https://w3w.co/life.exact.rush).
 |
| The footpath leaving The Woodman at point 36 |
37: Go through the gate then head SSE across an arable field for 125m to a gate (location - https://w3w.co/belong.kinks.city).
 |
| Go through the gate then head SE |
Cross Kentish Lane, turn left, then head NNE for 300m until you reach a track on the right (location - https://w3w.co/race.oppose.press).
39: Turn right on Essendon footpath 19 then head SE for 120m until the footpath leaves the track (location - https://w3w.co/sport.icon.bags), see image below.
 |
| Keep left and continue heading SE on Essendon footpath 19 |
 |
| Turn left at the gate on Essendon footpath 20 |
 |
| Go through the gate, still on Essendon footpath 20 |
41: Turn left on Hornbeam Lane, which is also Essendon bridleway 18 along this stretch, then head NW for 165m until you reach Kentish Lane (location - https://w3w.co/desks.votes.shiny).
42: Cross Kentish Lane then take Essendon footpath 15 on the other side (location - https://w3w.co/ballots.flute.theme).
Follow the footpath NW for 140m to a junction (location - https://w3w.co/invite.packet.points). On your left are some of the outbuildings of Camfield Place, the home of the late Barbara Cartland.
43: Turn right at the junction, still on Essendon footpath 15, then head NE for 495m and steadily downhill until you come to a gate leading to a footpath junction (location - https://w3w.co/combining.free.undulation).
44: Turn left at the junction then follow Essendon footpath 16 NW, with Essendon Brook on your right, for 430m until you reach a bridge over the point where Wildhill Brook merges with Essendon Brook (location - https://w3w.co/forces.figure.abode). This is another spot where you might spot a kingfisher if you are lucky.
 |
| Cross the bridge then continue on Essendon footpath 16 |
 |
| Turn right at the junction on Essendon Boat 14 |
47: Turn left on Essendon footpath 13 then follow it NW, with the hedgerow on the right and field on the left, for 430m to The Candlestick and West End Lane (location - https://w3w.co/successes.basin.treat).
 |
| The Candlestick, West End Lane |
Turn left on Essendon bridleway 10 then follow it as it weaves its way in a northerly direction for 915m until you reach a footpath on the right (location - https://w3w.co/upper.penny.gear).
49: Turn right on Essendon footpath 8 then follow it as it heads diagonally to the right across an arable field heading SE for 295m until you reach a farm track (location - https://w3w.co/golf.pardon.races).
50: Cross the farm track then cut through the hedgerow continuing on Essendon footpath 8 for 210m until you reach the edge of a small area of woodland (location - https://w3w.co/hired.since.cuts).
51: Continue straight on Essendon footpath 8 now heading SSE across an arable field for 240m until you reach West End Lane (location - https://w3w.co/refuse.cube.visit).
52: Turn left on West End Lane then follow it E. There isn't a pedestrian pavement along this stretch but there are places to stand aside in the case of approaching traffic. Continue on West End Lane for 625m until you reach a footpath on the left (location - https://w3w.co/funded.memo.awards).
53: Turn left on Essendon footpath 5 then head NE and diagonally to the right across a livestock field for 350m until you reach Essendon Hill (location - https://w3w.co/flown.answer.stream).
54: Cross Essendon Hill then continue on Essendon footpath 5 (location - https://w3w.co/track.ending.fell). Follow the footpath straight for 200m across a livestock field as it heads ENE before reaching a gate leading to Essendon golf course (location - https://w3w.co/pirate.took.acting).
 |
| Look right to check for any golfers then head NE |
 |
| Cross the junction then head E, now on Essendon footpath 2 |
57: Look both ways before crossing, still on Essendon footpath 2. Golfers are usually approaching this spot from the right. Continue heading E for 225m until you leave the golf course at a footbridge just before Bedwell Avenue (location - https://w3w.co/forms.grid.care).
 |
| Cross the footbridge then turn left |
59: Turn right on Little Berkhamsted footpath 1 then head E and uphill for 150m until you reach a gate leading to a lane (location - https://w3w.co/soon.orchestra.reef).
60: Turn left on the lane, which is also Little Berkhamsted bridleway 18 along this stretch, then head ENE for 170m until the lane bends to the left and you reach a footpath on the right (location - https://w3w.co/empty.stored.carbon).
61: Turn right on Little Berkhamsted footpath 4 then head SSE for 225m with a large house and gardens on the right continuing until you reach a gap in the hedgerow (location - https://w3w.co/games.brand.swaps).
62: Go through the gap then continue across a livestock field, still on Little Berkhamsted footpath 4 and still heading SSE, for 400m until you reach a lane (location - https://w3w.co/tile.only.flash).
63: Continue heading SSE now on Little Berkhamsted bridleway 18, for 440m until the path forks (location - https://w3w.co/then.jeeps.bring), see image below.
 |
| Take the left fork, Little Berkhamsted bridleway 19 |
65: Turn right on Breach Lane then follow it S for 320m until you reach Robins Nest Hill (location - https://w3w.co/later.loss.fast).
66: Cross Robins Nest Hill then take the footpath through the churchyard for 95m to Little Berkhamsted village (location - https://w3w.co/tonic.drip.toast).
67: Turn left in Little Berkhamsted village then head S for 60m until you reach a footpath on the right (location - https://w3w.co/aura.flips.pigs).
* There are two opportunities for refreshments in the village Emmy Murphy's Village Store (location - https://w3w.co/fats.plan.digit) and The Five Horseshoes (location - https://w3w.co/swaps.pots.modern).Turn right on the footpath immediately after Emmy Murphy's then follow Little Berkhamsted footpath 8 as it heads WSW along the edge of the village cricket pitch and with the hedgerow on the right for 180m until it reaches a gate (location - https://w3w.co/wicked.bunny.woof).
68: Go through the gate, turn left, then follow Little Berkhamsted bridleway 22 in a southerly direction for 740m to a junction (location - https://w3w.co/chef.visa.bared).
69: Keep right at the junction then continue heading S for 410m until you pass houses on the left and a communication tower on the right (location - https://w3w.co/passes.owners.free) then reach a track on the right (location - https://w3w.co/gains.hurls.locker).
 |
| Turn right on Little Berkhamsted footpath 13 |
71: Turn left on Tylers Causeway then head E for 100m before taking a footpath on the right (location - https://w3w.co/paint.older.carbon).
72: Turn right on Hatfield footpath 80 then head S and downhill with the hedgerow on the left and field on the right. After 420m you will pass a small pond on the right (location - https://w3w.co/just.inspector.call), see image below.
 |
| The pond to the right of Hatfield footpath 80 |
73: Turn right on Hatfield restricted byway 88 then head WNW for 1.1km until you reach a bridleway on the left shortly after a bend (location - https://w3w.co/broken.hurry.ropes).
74: Turn left on Hatfield bridleway 87 then head in a westerly direction for 1.4m until you reach a farm (location - https://w3w.co/shins.begun.brick).
75: Continue straight through the farmyard, still on Hatfield bridleway 87, then continue still in a westerly direction for 810m until you reach Kentish Lane (location - https://w3w.co/port.honest.will).
76: Cross Kentish Lane then continue straight heading W, now along Grubbs Lane, for 220m until you reach a footpath on the left (location - https://w3w.co/taped.unwanted.meals).
 |
| Turn left on Hatfield footpath 86 |
 |
| The spigot mortar emplacement |
 |
| Cross the footbridge then follow North Mymms footpath 37 |
79: Cross The Great North Road then turn right and head NNW along a pedestrian pavement for 115m before reaching Bell Lane on the left (location - https://w3w.co/slam.flags.watch).
* If you need refreshments when you reach Bell Lane you could continue along The Great North Road heading NW for 220m to visit The Dutch Market Place cafe (location - https://w3w.co/music.limit.parade) or continue for another 180 to visit The Cock o' the North (location - https://w3w.co/softly.casino.camps).80: Turn left on Bell Lane then take the first track on the left (location - https://w3w.co/oppose.margin.panels) which is called The Drive and which is also North Mymms footpath 68. Head SSW for 180m until you reach the top of Pine Grove (location - https://w3w.co/window.buck.canny).
81: Keep right at the top of Pine Grove then continue along North Mymms footpath 68 with Chancellor's School on the left. Follow this path for 320m until you reach Golf Club Road (location - https://w3w.co/rank.point.activism).
82: Turn left on Golf Club Road, which is still North Mymms footpath 68, then follow it S for 430m until you reach a junction (location - https://w3w.co/caged.towns.wooden).
83: Cross the junction then follow Mymms Drive S for 320m passing Moffats Lane (location - https://w3w.co/speak.jungle.slate) and The Grove (location - https://w3w.co/rotate.fires.pokers) on your right and continuing until you reach a track between the houses on the right (location - https://w3w.co/face.beside.woes).
84: Turn right then follow the track SW for 135m to a gate leading to Gobions Open Space (location - https://w3w.co/skill.legal.dart).
85: Go through the gate then follow the path round to the right and head W through the woodland for 275m until you reach a clearing (location - https://w3w.co/push.wished.boots).
Head straight across the clearing heading W for 140m to the car park and a play area (location - https://w3w.co/tribe.topped.wonderfully).
86: At this point those who travelled by car can return to the car park (location - https://w3w.co/prop.gained.shield). For those who travelled by train, turn left at the play area then head S to point 4 in the directions (location - https://w3w.co/memo.pots.manual).
From there you can retrace your steps back to Brookmans Park Station by going through the gap in the hedgerow (location - https://w3w.co/hurls.hurt.admits). Head W for 300m to Bluebridge Avenue (location - https://w3w.co/tape.hooks.relax). Head SW along Bluebridge Avenue for 195m to Bluebridge Road (location - https://w3w.co/coast.fall.crops). Turn right on Bluebridge Road then head NW for 360m back to Brookmans Park village and the station beyond.
* If you need refreshments there is the choice of Tealicious (location - https://w3w.co/tooth.luxury.slowly), Brookmans Bakery (location - https://w3w.co/bring.pest.former), and Brookmans pub/restaurant (location - https://w3w.co/fell.risky.privately).

No comments:
Post a Comment
Comments and feedback
If you try any of the walks on this site, please let us know what you thought of them by adding a comment here or on our members-only Facebook group. Comments here are checked before they are published. Comments on the Facebook group go live immediately.